FAQ Time Timer® WASH + Soap Dispenser

For help with the Time Timer® WASH + Soap Dispenser

Operation & How-To

Time Timer® WASH + Soap Dispenser User Guide
Steps for First Use
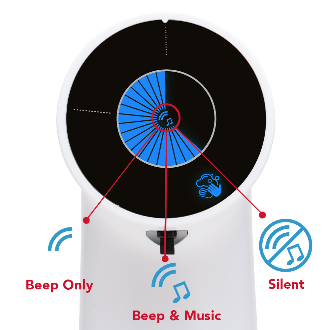
How to Change the Sound Settings on the Time Timer® WASH + Soap Dispenser
How the Time Timer® WASH + Soap Dispenser Works

Troubleshooting

My Time Timer® WASH + Soap Dispenser is not charging
My Time Timer® WASH + Soap Dispenser is not dispensing
My Time Timer® WASH + Soap Dispenser is dripping soap after I pull my hand away
My Time Timer® WASH + Soap Dispenser is auto-dispensing

Frequently Asked Questions

What Kind of Soap Should I Use in my WASH + Soap Dispenser?
How close does my hand have to be to start soap dispensing?
How long does it take for the Time Timer® WASH + Soap Dispenser to reach full charge?
How do I know if my unit needs to be charged?
How do I know if my unit is charging? What does the green light mean?

Time Timer® WASH + Soap Dispenser User Guide
Download Time Timer® WASH + Soap Dispenser User Guide PDF below.


1. Charge Dispenser

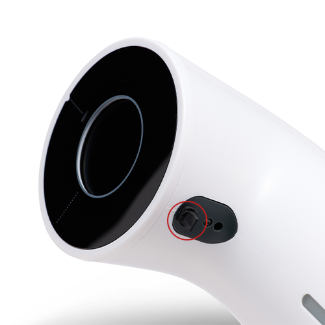
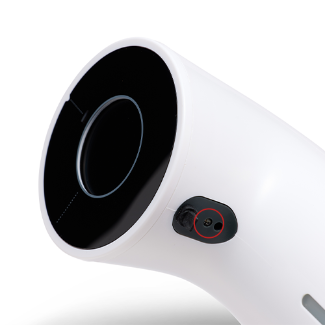
To charge the dispenser, plug the provided mini-USB cable into the right-hand side of the unit. Plug the USB side of the cable into a USB fitted wall outlet or charging block.   

Solid green light appears above the charging port to represent full charge. If green light is flashing, the unit is still charging. It will take about three hours for the WASH + Soap Dispenser to reach a full charge. 

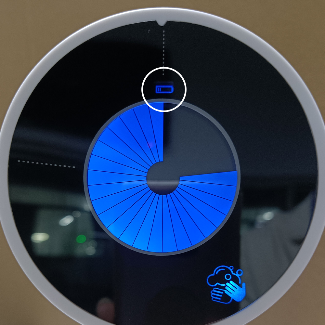
The Low Battery Indicator will display on the face.

Note: Dispenser does not need to remain plugged in for operation, but will continue to operate when plugged in.  


2. Fill Pump

Fill dispenser with soap by removing cap on the back of unit and filling with regular liquid handwashing soap. It is not recommended to use Hand Sanitizer, Foaming Soap or Exfoliating Soaps with the Time Timer WASH + Soap Dispenser.  

The amount of soap that will dispense will depend on the thickness of the liquid soap. If you would like more soap to be dispensed, add a little bit of water to the soap.  

Note: Do not overfill. Do not use exfoliating soap, foaming soap, or hand sanitizer.


3. On/Off

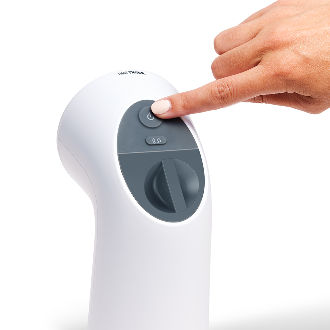
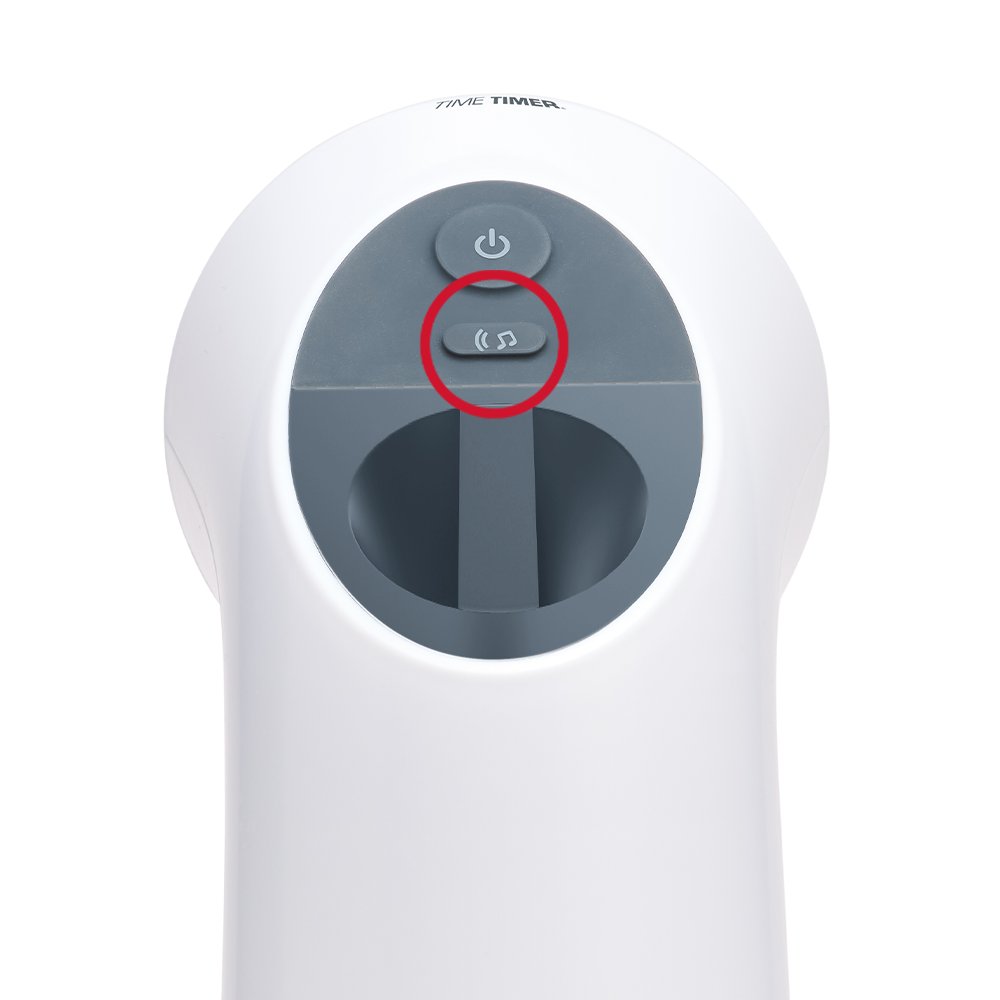
Turn unit on and off by pushing the power button on the back of the unit. You will hear a “ker-plunk!” sound to indicate that the unit has been turned on or off.   

4. Adjust Sound 

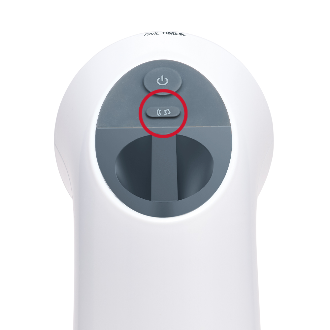
Once the unit has been powered on, choose your preferred sound setting by pushing the sound button located under the Power button on the back of the unit. Continue to press to cycle through the three sound options:  

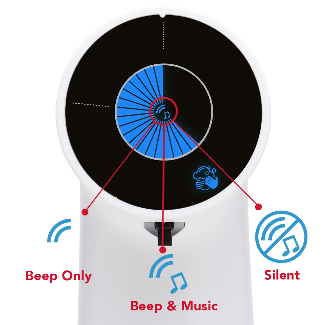
  1. Beep only – a short beep will sound at the beginning of the wash cycle (when hand is placed under unit to retrieve soap), a second beep will indicate when it is time to rinse your hands, and a third beep will indicate the completion of the handwashing cycle.  
  2. Beep & Music – the beeps will sound as described above in addition to a fun song to entertain while washing hands.  
  3. Silent – no sounds will be made by the handwashing timer. The icons and disk will illuminate and indicate the current step of the process as time elapses. 

5. Wash Hands 

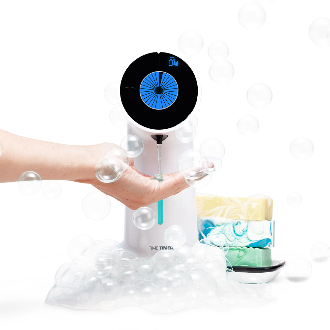
Once your preferred settings are selected, the unit is charged, and the soap is filled, you are ready to safely wash your hands! Simply hold your hand under the soap dispensing spout as shown below, and the soap will automatically release into hand.  

The amount of soap that is dispensed will depend on the thickness of the soap contained in the soap basin. If more soap is desired as you are washing hands, place hand under spout again. The timer will continue through the cycle. 

Timer initiates automatically once soap is dispensed. 

Tips:  

Clean spout regularly to prevent clogs. If spout becomes clogged, run pump with warm water solution. 

If sensor is not reading,turn pump off,then wipe the sensor area to remove any build up

While the WASH + Soap Dispenser is water resistant, do not submerge pump in water or use in shower.


Download WASH_Soap_TT_UserGuides_052924.pdf

Steps for First Use

Congratulations on your new Time Timer WASH + Soap Dispenser ! Here are some simple steps to take to get you started: 

1. Remove Time Timer WASH + Soap Dispenser from the package.  

2. Carefully peel off the protective sticker that covers the face of the Time Timer WASH + Soap Dispenser. 

3. Charge your dispenser by plugging the provided USB charging cable into the Time Timer WASH + Soap Dispenser unit and into a USB fitted wall plug or charging block. A solid green light above the charging port represents full charge. If the light is blinking, the unit is still charging. The WASH + Soap Dispenser should reach a full charge in about 3 hours. 

4. Fill dispenser withliquidsoap by removing cap on the back of unit and filling withregular handwashing soap.Do not use foaming soap, exfoliating soap, or hand sanitizer.

Use window on front of unit todeterminefill level. Do not overfill. Replace basin cap after filled.

5. Turn Time Timer WASH + Soap Dispenser unit on.Turn unit on and off by pushing the power button on the back of the unit. You will hear a “ker-plunk!” sound toindicatethat the unit has been turned on or off.  

6. Placehandunderunitto dispense soap and beginuse. 

How to Change the Sound Settings on the Time Timer® WASH + Soap Dispenser
The Time Timer® WASH + Soap Dispenser has optional audible prompts at the start, end, and transitions between steps, can be operated silently, or play a fun song to pass the time while going though the handwashing cycle: 

  1. To turn on the “beep” transition prompts only, press the sound button below the power button until the curved sound lines icon appears in the center of the timer disk.  
  2. In addition to the “beep” transition prompt, there is optional music that plays during the 30 second countdown. The Music note icon will appear in the center of the disk to indicate the music is on. To turn off the music, press the sound button below the power button until the musical note icon disappears, leaving only the curved sound lines.    
  3. To turn off both the transition “beep” prompt and the music, press the sound button below the power button until both icons appear in a circle with a line through the center which indicates silent operation.

How the Time Timer® WASH + Soap Dispenser Works
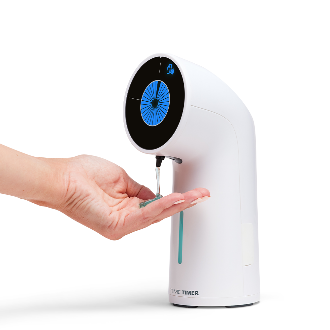
1. Placehandundersensorto activate the soap being dispensed. Timer initiates automatically when soap is dispensed.

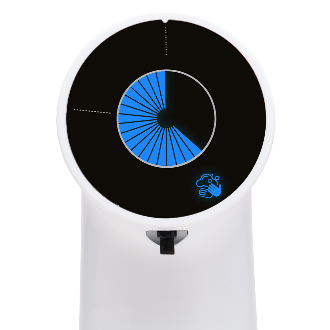
2. Timer initiates automatically when soap is dispensed and begins the 30 second countdown. You will see each icon display as the it times the handwashing cycle.  

  • Soap Dispensing – 3 seconds 
  • Scrub hands – 20 seconds  
  • Rinse hands and dry – 7 seconds

3. The WASH + Soap Dispenser has optional audible prompts at the start,end and transitions between steps. To turn off the transition prompts, press the sound button below the powe rbutton until the curved lines icon in the center disappears.

4. There is also optional music that plays during the 30 second countdown. To turn off the music, press the sound button below the power button until the musical note icon disappears.    

5. To turn off both the transition prompt and the music, press the sound button below the power button until both icons appear in a circle with a line through the center which indicates silent operation.  
 

6. To stop or start the music or transition prompt while the timer is in operation, press the sound button below the power button.  

7. To stop the timer before the end of the countdown cycle, press the power button on the back of the Time Timer WASH + Soap Dispenser unit.  

What Kind of Soap Should I Use in my WASH + Soap Dispenser?

The Time Timer WASH + Soap Dispenser is designed to be used with liquid hand soaps. The unit is not designed to have foaming soap, exfoliating soap, or sanitizer dispensed. 


Some recommended brands that have been tested in the Time Timer WASH Dispenser unit with their liquid hand soaps: 

  • Everyone Soap
  • Softsoap
  • Mrs. Meyer's 
  • Method 

How close does my hand have to be to start soap dispensing?

The dispenser activates up to about 2.5 inches (6 cm) from the nozzle. An easy indicator is the keep you hand somewhere between the top of the Soap window and the spout.

How long does it take for the Time Timer® WASH + Soap Dispenser to reach full charge?
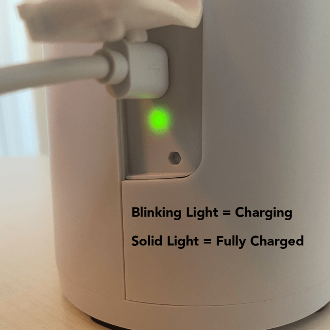
It will take about three hours for the WASH + SoapDispenserto reach a full charge. When plugged in and charging a green light will flash near the charging port; once the unit is charged, the light will stay steady green.

How do I know if my unit needs to be charged?
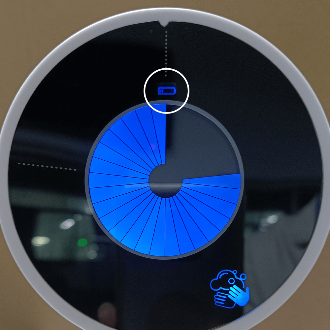
1.When the battery begins running low, a small icon will light up and blink continually in the upper-center part of the face of the dispenser.

2. When the icon blinks, plug the unit in for a charge. Once the unit is plugged in, the low battery indicator will turn off, and a green LED light near the USB charging port will blink.  Once the green light stops blinking and is solid green, the unit is fully charged. 


3. The low-battery icon light on the face of the timer will blink for about two days (depending on use) before the battery runs down enough to turn it off. If you do not see the low-battery icon and your unit will not turn on, plug your unit in to recharge.  


4. If you do not see the icon blink, but the unit starts acting unusual (e.g. music does not play, or pie slices turn off halfway through) then plug the unit in to recharge. 

How do I know if my unit is charging? What does the green light mean?

Blinking green means “I am charging” 

Solid green means “I am fully charged.” The unit can remain plugged in continually to remain fully charged if desired.

My Time Timer® WASH + Soap Dispenser is not charging
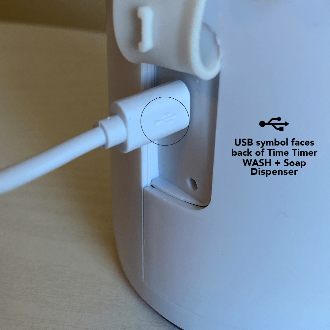
1. Ensure there are no breaks or damage to the cord. 


2. Check that the cable is fully plugged in on both the power side and the product side. Ensure there is power to the outlet where the unit plugged in. 


3. Ensure that the cable head is facing the correct direction when plugged into the product.

4.When plugged in and charging,a green light will flash near the charging port; once the unit is charged, the light will stay steady green.

My Time Timer® WASH + Soap Dispenser is not dispensing

1. If the motor runs but soap is not dispensing, first check the soap reservoir to make sure the unit is full of liquid soap. 


2. If the reservoir does have soap and is freshly filled, note that it may take up to five activations before the pump brings the soap to the nozzle and dispenses soap. Place your hand repeatedly under the nozzle to see if soap dispenses after the fifth activation. 


3. If the reservoir does contain soap but no soap dispenses after repeated activations, then hardened soap particles may be clogging the dispensing tube. Pour the remaining soap out of the unit. Fill the reservoir with very warm (but not boiling hot) water. Gently swirl the unit for a minute or two then pour out the warm water. Repeat this as necessary until water is not soapy when poured out. Fill the reservoir again with warm water, and then activate it by placing your hand under the dispenser (be careful that the water is not too hot). Activate repeatedly to get the warm water pumped up the tube to break the clog.  


4. Soaps with fragrance particles or exfoliating scrubs are not recommended as the particles can clog the dispensing tube. Thick gel-type soaps are also not recommended. 

My Time Timer® WASH + Soap Dispenser is dripping soap after I pull my hand away

1. Keep your hand underneath the dispenser for the duration of the motor pumping the soap. The motor activates for a little over one second to dispense the soap.  


2. If the dispenser drips soap after the motor has turned off, then gently clean the dispenser nozzle with a cloth or cotton swab to remove any particles that are holding the nozzle open. 


3. If the dispenser continues to drip, then try changing soaps to one that is less watery. 

My Time Timer® WASH + Soap Dispenser is auto-dispensing

If the product is set on a shiny surface, such as a marble countertop, then sunlight or overhead lights can reflect off the countertop and fool the unit into activating the soap dispenser. Move the unit slightly or place a matte pad underneath the unit to block the reflection orsunlight from coming in at an angle that actives the unit.